composer require 42coders/document-templates
php artisan vendor:publish --provider="BWF\DocumentTemplates\DocumentTemplatesServiceProvider"
php artisan migrate
<!doctype html>
<html lang="en">
<head>
<meta charset="UTF-8">
<title>Invoice - #123</title>
<style type="text/css">
@page {
margin: 0px;
}
body {
margin: 0px;
}
* {
font-family: Verdana, Arial, sans-serif;
}
a {
color: #fff;
text-decoration: none;
}
table {
font-size: x-small;
}
tfoot tr td {
font-weight: bold;
font-size: x-small;
}
.invoice table {
margin: 15px;
}
.invoice h3 {
margin-left: 15px;
}
.information {
background-color: rgb(85, 47, 218);
color: #FFF;
}
.information .logo {
margin: 5px;
}
.information table {
padding: 10px;
}
</style>
</head>
<body>
<div class="information">
<table width="100%">
<tr>
<td align="left" style="width: 40%;">
{% block customer_details %}
{% endblock %}
<br/><br/>
<pre>
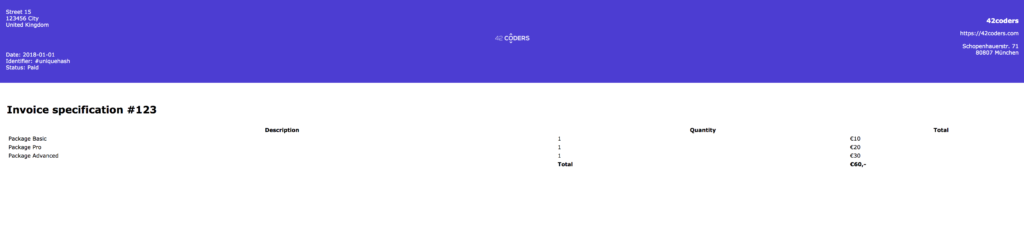
Date: 2018-01-01
Identifier: #uniquehash
Status: Paid
</pre>
</td>
<td align="center">
<img src="https://42coders.com/wp-content/uploads/elementor/thumbs/logo-o9jp5a9c6jnn02f7yrqrfuzv6pr1lrqw5amfzuffv4.png" alt="Logo" width="64" class="logo"/>
</td>
<td align="right" style="width: 40%;">
<h3>42coders</h3>
<pre>
https://42coders.com
Schopenhauerstr. 71
80807 München
</pre>
</td>
</tr>
</table>
</div>
<br/>
<div class="invoice">
<h3>Invoice specification #123</h3>
{% block order_items %}
{% endblock %}
</div>
<div class="information" style="position: absolute; bottom: 0;">
<table width="100%">
<tr>
<td align="left" style="width: 50%;">
</td>
<td align="right" style="width: 50%;">
42coders
</td>
</tr>
</table>
</div>
</body>
</html><?php
namespace App\DocumentTemplates;
use App\User;
use BWF\DocumentTemplates\DocumentTemplates\DocumentTemplate;
use BWF\DocumentTemplates\DocumentTemplates\DocumentTemplateInterface;
class InvoiceTemplate implements DocumentTemplateInterface
{
use DocumentTemplate;
protected $testOrders = [
[
'id' => '1',
'description' => 'Package Basic',
'price' => 10
],
[
'id' => '2',
'description' => 'Package Pro',
'price' => 20
],
[
'id' => '3',
'description' => 'Package Advanced',
'price' => 30
],
];
protected function dataSources()
{
return [
$this->dataSource($this->testOrders[0], 'order', true, 'orders'),
$this->dataSource(new User(), 'user'),
];
}
}<?php
namespace App;
use BWF\DocumentTemplates\TemplateDataSources\ModelProvidesTemplateData;
use BWF\DocumentTemplates\TemplateDataSources\TemplateDataSourceInterface;
use Illuminate\Contracts\Auth\MustVerifyEmail;
use Illuminate\Foundation\Auth\User as Authenticatable;
use Illuminate\Notifications\Notifiable;
class User extends Authenticatable implements TemplateDataSourceInterface
{
use Notifiable, ModelProvidesTemplateData;<?php
namespace App\Http\Controllers;
use App\DocumentTemplates\InvoiceTemplate;
use BWF\DocumentTemplates\DocumentTemplates\DocumentTemplateFactory;
use BWF\DocumentTemplates\DocumentTemplates\DocumentTemplateModelInterface;
use BWF\DocumentTemplates\Http\Controllers\DocumentTemplatesController;
use BWF\DocumentTemplates\TemplateDataSources\TemplateDataSource;
use BWF\DocumentTemplates\TemplateDataSources\TemplateDataSourceFactory;
use Illuminate\Http\Request;
use Illuminate\Support\Facades\Auth;
class InvoiceTemplatesController extends DocumentTemplatesController
{
protected $testOrders = [
[
'id' => '1',
'description' => 'Package Basic',
'price' => 10
],
[
'id' => '2',
'description' => 'Package Pro',
'price' => 20
],
[
'id' => '3',
'description' => 'Package Advanced',
'price' => 30
],
];
/**
* @return TemplateDataSource[]
*/
protected function getTestOrders()
{
$dataSources = [];
foreach ($this->testOrders as $item) {
$dataSources[] = TemplateDataSourceFactory::build($item, 'order');
}
return collect($dataSources);
}
protected $documentClasses = [
InvoiceTemplate::class,
];
protected function getTemplateData()
{
return [
'user' => Auth::user(),
'orders' => $this->getTestOrders(),
];
}
public function show(DocumentTemplateModelInterface $documentTemplateModel)
{
$documentTemplate = DocumentTemplateFactory::build($documentTemplateModel);
$templateData = $this->getTemplateData();
foreach ($templateData as $name => $data) {
$documentTemplate->addTemplateData($data, $name);
}
return $documentTemplate->render();
}
}\BWF\DocumentTemplates\DocumentTemplates::routes(InvoiceTemplatesController::class);
<?php
use Illuminate\Database\Seeder;
class EditableTemplatesTableSeeder extends Seeder
{
/**
* Run the database seeds.
*
* @return void
*/
public function run()
{
$documentTemplate = \BWF\DocumentTemplates\DocumentTemplates\DocumentTemplateModel::create([
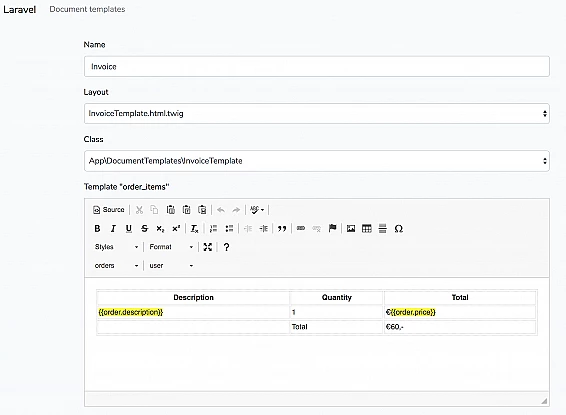
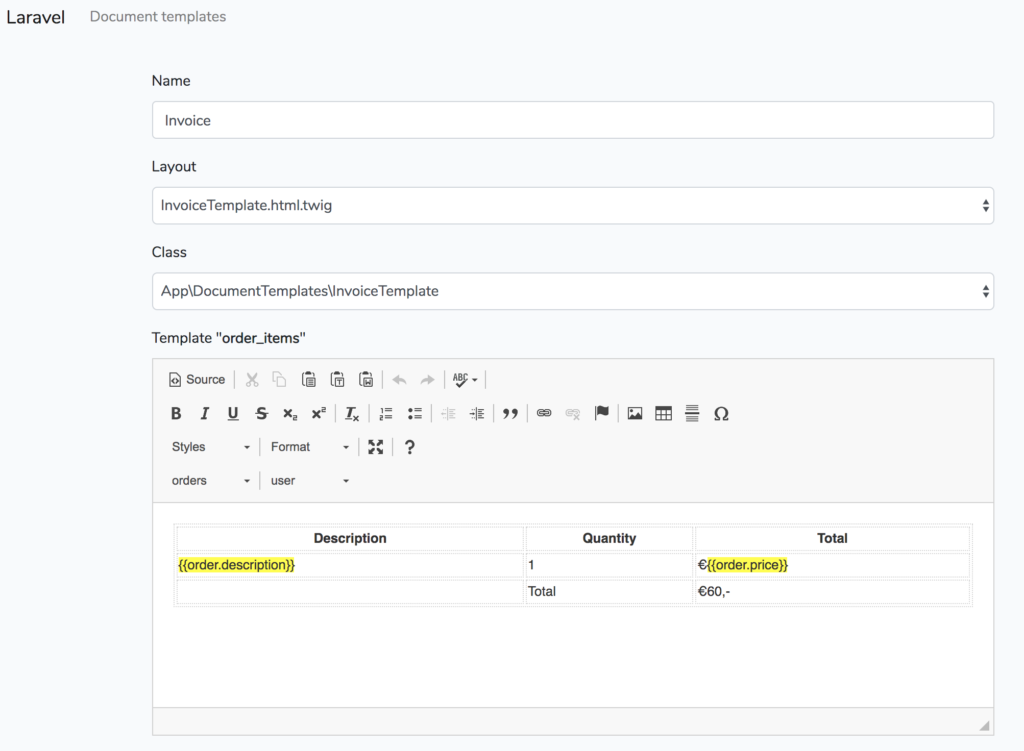
'name' => 'Invoice',
'document_class' => \App\DocumentTemplates\InvoiceTemplate::class,
'layout' => 'InvoiceTemplate.html.twig'
]);
$documentTemplate->save();
\BWF\DocumentTemplates\EditableTemplates\EditableTemplate::create([
'document_template_id' => $documentTemplate->id,
'name' => 'order_items',
'content' => '
<table width="100%">
<thead>
<tr>
<th>Description</th>
<th>Quantity</th>
<th>Total</th>
</tr>
</thead>
<tbody>
{% for order in orders %}
<tr>
<td>
{{order.description}}
</td>
<td>1</td>
<td>
€{{order.price}}
</td>
</tr>
{% endfor %}
</tbody>
<tfoot>
<tr>
<td colspan="1"></td>
<td align="left">Total</td>
<td align="left" class="gray">€60,-</td>
</tr>
</tfoot>
</table>
'
])->save();
\BWF\DocumentTemplates\EditableTemplates\EditableTemplate::create([
'document_template_id' => $documentTemplate->id,
'name' => 'customer_details',
'content' => '
<h3>{{user.name}}</h3>
<pre>
Street 15
123456 City
United Kingdom
</pre>
'
])->save();
}
}<?php
use Illuminate\Database\Seeder;
class UsersTableSeeder extends Seeder
{
/**
* Run the database seeds.
*
* @return void
*/
public function run()
{
factory(App\User::class, 1)->create(
[
'name' => 'Administrator',
'email' => 'admin@bwf',
'password' => bcrypt('secret')
]
);
}
} public function run()
{
$this->call(UsersTableSeeder::class);
$this->call(EditableTemplatesTableSeeder::class);
}php artisan db:seed
composer require laravel/ui --dev
php artisan ui bootstrap
php artisan ui vue
npm run dev
<!DOCTYPE html>
<html lang="{{ str_replace('_', '-', app()->getLocale()) }}">
<head>
    <meta charset="utf-8">
    <meta name="viewport" content="width=device-width, initial-scale=1">

    <!-- CSRF Token -->
    <meta name="csrf-token" content="{{ csrf_token() }}">

    <title>{{ config('app.name', 'Laravel') }}</title>

    <!-- Scripts -->
    <script src="{{ asset('js/app.js') }}" defer></script>

    <!-- Fonts -->
    <link rel="dns-prefetch" href="//fonts.gstatic.com">
    <link href="https://fonts.googleapis.com/css?family=Nunito" rel="stylesheet" type="text/css">

    <!-- Styles -->
    <link href="{{ asset('css/app.css') }}" rel="stylesheet">
</head>
<body>
    <div id="app">
        <nav class="navbar navbar-expand-md navbar-light navbar-laravel">
            <div class="container">
                <a class="navbar-brand" href="{{ url('/') }}">
                    {{ config('app.name', 'Laravel') }}
                </a>
                <button class="navbar-toggler" type="button" data-toggle="collapse" data-target="#navbarSupportedContent" aria-controls="navbarSupportedContent" aria-expanded="false" aria-label="{{ __('Toggle navigation') }}">
                    <span class="navbar-toggler-icon"></span>
                </button>

                <div class="collapse navbar-collapse" id="navbarSupportedContent">
                    <!-- Left Side Of Navbar -->
                    <ul class="navbar-nav mr-auto">
                        <li class="nav-item">
                            <a class="nav-link" href="{{ route(config('document_templates.base_url') . '.index') }}">{{ __('Document templates') }}</a>
                        </li>
                    </ul>

                    <!-- Right Side Of Navbar -->
                    <ul class="navbar-nav ml-auto">
                    </ul>
                </div>
            </div>
        </nav>

        <main class="py-4">
            @yield('content')
        </main>
    </div>
</body>
</html>
Sign up for our newsletter to stay up to date.
We care about the protection of your data. Read our Privacy Policy.


Schopenhauerstr. 71
80807 München
max@42coders.com
+49 (0)176 / 724 306 82
© 2026 42coders All rights reserved.